A First Market Table with One Clear Point of Focus
Plan a first market table around one featured item and an easy browsing route, so visitors can understand what you make and where to begin.
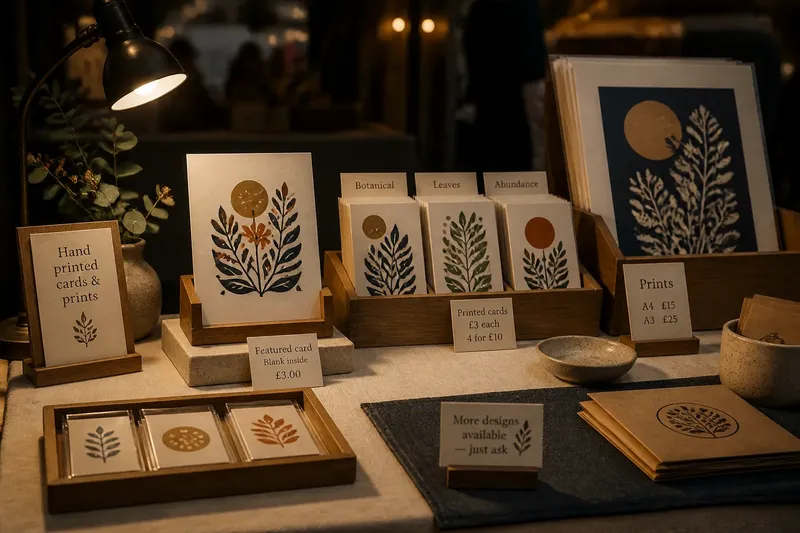
You have a box of finished work, a folding table and a market date on the calendar. For a first market table, the useful question is not how to display everything; it is what a passerby should notice first, and what they should be able to browse next.
Choose one featured item, then arrange the rest of the display as a clear route outward from it. That gives people an easy starting point without making the table feel like a single-product stall. The right layout depends on what you sell, how much room you have and how visitors are likely to approach.
What should your table say at a glance?
Pick the item that best represents the kind of work you want people to remember. It might be a ceramic mug with a distinctive handle, a printed tea towel with your strongest pattern, or a small carved object that makes your materials and style easy to understand.
The featured item should be visible from the aisle, not hidden among similar pieces. Give it a little breathing room and place a short, readable sign nearby if people might not know what it is or how it is used. Keep the wording focused on the item rather than trying to explain your entire creative practice.
Then decide what belongs close to it. Related pieces can make the feature easier to browse: a mug beside a small bowl, for instance, or a larger print near a smaller version of the same design. The connection should be apparent without requiring a long explanation from you.
Which layout fits the way visitors approach?
If people can walk up from only one side, a front-to-back arrangement is usually easiest to read. Put the featured item toward the front, then set related options behind or beside it, leaving enough open surface for visitors to see labels and pick things up without reaching across a crowded patch.
If visitors can approach from more than one side, avoid making the display depend on a single front-facing sign. Place the feature where it can be spotted from the main approach, and keep the browsing path open around it. A small tabletop sign that can be read from more than one direction may help, provided it does not block the work.
For a narrow table, use a simple line: feature, related work, then the remaining range. For a deeper table, make a shallow zone nearest the visitor and a second zone farther back, rather than spreading small objects across every inch. A cloth, low boxes or sturdy risers can help define those areas, but the work should remain stable and visible.
What fits your stock and table space?
If you have only a few pieces, resist the urge to fill empty space with unrelated decorations. A small, intentional group can make each object easier to notice. Use a plain cloth or a tray to give the work a boundary, and keep packaging and spare stock out of the main viewing area.
If you have many variations, show a modest selection of each kind rather than every available color or pattern. A neatly arranged sample can represent a larger range, while a simple note tells visitors that other options are available. Store the rest within reach so you can answer a specific request without turning the table into a stock pile.
If your work is fragile, bulky or awkward to handle, choose a feature that can be viewed comfortably without constant lifting. Keep delicate pieces away from the table edge and provide a clear place to set an item down. For anything that needs special handling or display support, follow the maker’s instructions and the market’s rules.
How should visitors move from the feature to a choice?
Make the next browsing decision obvious. Group items by a quality visitors can see, such as design, material, use or size, and use small signs only where the grouping would otherwise be unclear. A sign that says “small prints” is more helpful than a slogan that leaves people guessing what is for sale.
Keep prices close to the relevant items. If pieces share a price, one clear sign can cover the group; if they differ, label them individually or use another arrangement that leaves no doubt about which price belongs to which object. Keep payment details and bags accessible without putting them between visitors and the work.
Say you make hand-printed greeting cards and bring several designs, plus a few larger prints. Imagine your featured card has the clearest pattern and sits at the front, with the other cards grouped by design and the prints behind them under a readable sign. A visitor can start with the featured card, compare the related designs and then notice the larger work without having to ask where to look.
What if your situation is less straightforward?
What if all my products seem equally important?
Choose the piece that most clearly signals the kind of work you want to sell, rather than the one you feel obliged to promote. If no single object does that, feature a small, coherent group with one item positioned slightly forward as the starting point.
What if the market provides a very small table?
Reduce the number of items on view and make the featured piece easy to identify. Keep extra stock and personal supplies in a container below or behind the table, and use one compact sign instead of several competing displays.
What if visitors stop but do not know how to browse?
Look for the point where their attention stalls: a blocked label, an unclear grouping or a feature buried among similar objects. Adjust that one part of the route and use a brief invitation such as “The printed cards are here” when someone seems unsure where to begin.
What if I make items in very different styles?
Choose one style to lead the display, then give the others distinct, clearly named areas. If the pieces do not naturally belong together, a single featured item can still establish a starting point while separate groupings prevent the table from reading as a jumble.
How can you check the arrangement before market day?
Set the display on a surface at roughly the same height as your market table, using the actual cloth, signs, trays and risers you plan to bring. Step back to the distance where a visitor might first see it, then look for the featured item, the route to related work and the prices. If one of those takes effort to locate, move or remove something rather than adding another sign.
Ask a friend who has not watched you arrange the table to point out what they notice first and where they would browse next. Treat their response as a prompt to inspect the display, not as a verdict on your work: if they point somewhere unexpected, check whether the layout is sending a different signal than you intended.
A first market table does not need to show every decision behind your work. A clear featured item, a legible browsing route and enough room to look closely can help visitors understand what is available. As you prepare your first market table, leave one practical detail for yourself too: a clear spot for wrapping purchases, so serving a customer does not interrupt the next person’s chance to browse.